

%20for%20Microsoft%20Power%20Platform%20-%20A%20Comprehensive%20Guide%20(Part%205%20-%20approval%20with%20pipeline))
Table of Contents
This is the fifth part of a series of articles, part 1 (basics and background & part 2 (preparing your environments) & part 3 (working with solutions) & part 4 (working with pipelines) were published before.
Incorporating an approval process into a pipeline before deploying a Power Platform solution to a production environment is crucial for several reasons:
-
Quality Assurance: The approval process ensures that the solution has been thoroughly tested and meets the required quality standards before it is deployed to the production environment.
-
Risk Mitigation: It helps to identify and rectify any potential issues or bugs that could impact the performance or functionality of the solution in the production environment.
-
Change Management: The approval process provides a structured approach to managing changes, ensuring that all stakeholders know the upcoming deployment and agree to it.
-
Compliance: It ensures the solution complies with all relevant regulations and standards, particularly important in regulated industries.
-
Accountability: The approval process creates a record of who approved the deployment, adding a layer of accountability.
In summary, an approval process is a critical step in the deployment pipeline that helps ensure the solution’s reliability, functionality, and compliance while also providing a clear record of decision-making.
Prepare the basics
-
Visit the Maker Portal.
-
Ensure you are in the Prod environment; if not, switch to it.
-
Locate the Deployment Pipeline Configuration app, hover over it, and click the play button.
-
This action opens the Deployment Pipeline Configuration app, allowing you to modify your pipeline. Choose the “Demo Pipeline” option (or whatever you created in part 4 of this series).
-
On the following screen, scroll down to the deployment stages and select the “Deploy to prod” deployment stage by clicking its name.
-
Enable the checkbox in the “Pre-Deployment Step Required” field, and click the “Save & Close” button in the command bar at the top.
-
In the Deployment Stages subgrid, verify if the “Pre-Deployment Step Required” field has changed to “Yes.” If so, you have completed this task. If not, return to step 5 and try again.
Create a cloud flow that handles the approval
In this task, you will learn how to create an approval flow that will handle the approval before deploying to production.
-
Go to the Maker Portal.
-
Ensure you are in the Prod environment; if not, switch to it.
-
Click “Get Started” in the welcome pop-up.
-
In the left navigation, select “Flows.” Then, click “New Flow” at the top command bar and choose “Automated Cloud Flow.”
-
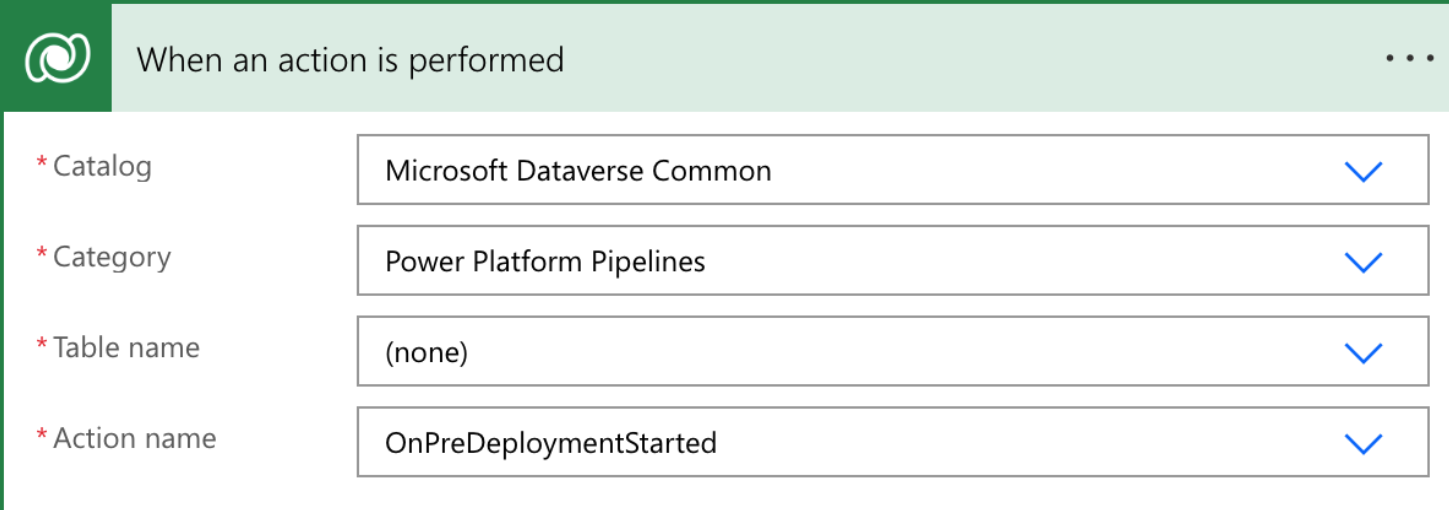
A pop-up will appear, allowing you to name your flow and configure a trigger. Name your flow “Production Approval,” search for an action, and select the Microsoft Dataverse trigger called “When an action is performed.”
-
Finally, click the blue “Create” button.
-
Configure the trigger inputs
-
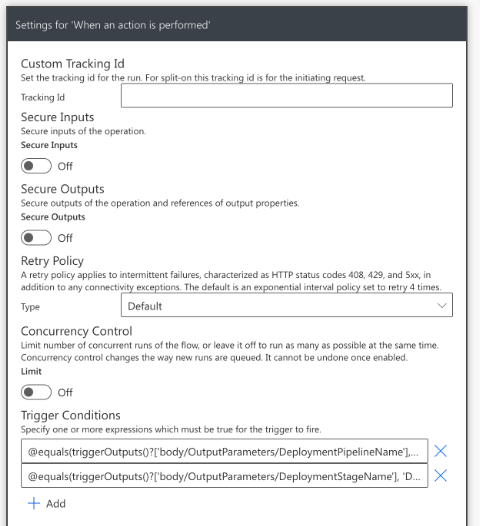
Select the three dots in the top-right corner of the trigger, then choose “Settings” to open the trigger settings.
-
Click the “Add” button below trigger conditions to include a new trigger condition in the trigger settings.
-
Insert the following trigger condition to ensure that the cloud flow is activated only when the pipeline name is “Demo Pipeline”:
@equals(triggerOutputs()?['body/OutputParameters/DeploymentPipelineName'], 'Demo Pipeline') -
Select the “Add” button below the trigger condition to include an additional trigger condition.
-
Insert the following trigger condition to ensure that the cloud flow is activated only when the pipeline name is “Deploy to prod”:
@equals(triggerOutputs()?['body/OutputParameters/DeploymentStageName'], 'Deploy to prod') -
Press the “Done” button at the bottom of the trigger card to save the trigger conditions.
-
Click the “New step” button to add an action that initiates and awaits approval.
-
Search for “approval” and choose the “Start and wait for an approval” action.
-
Configure the approval action:
-
For the approval type, select “Approve/Reject - First to respond.”
-
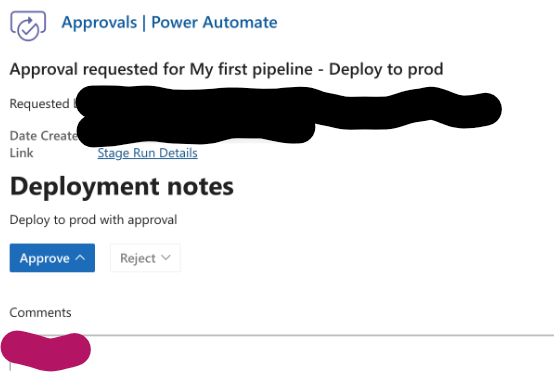
For the title, add “Approval requested for”, select “ActionOutputs DeploymentPipelineName” from the dynamic content fields on the right, add “-“, and select another dynamic content field from the right called “ActionOutputs DeploymentStageName.”
-
For “assigned to”, enter the email address of your user.
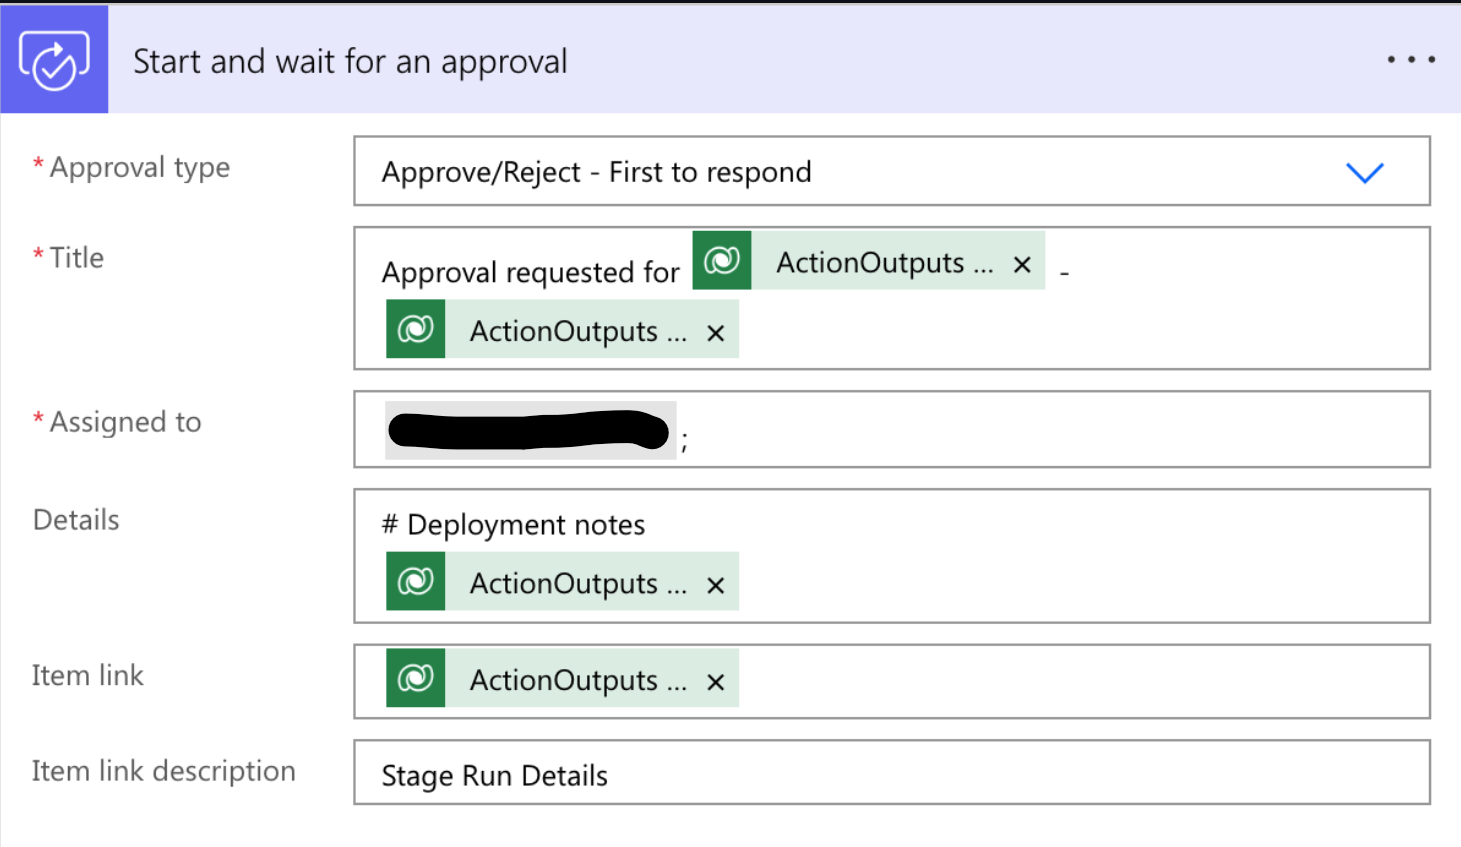
In production scenarios, an admin would typically approve deployments.
-
For details, add “# Deployment Notes”, insert a “return”, and choose the “ActionOutputs DeploymentNotes” field from the dynamic content fields on the right.
-
Select the “ActionOutputs StageRunDetailsLink” from the dynamic content fields on the right for the item link.
-
For the item link description, add “Stage Run Details.”
-
-
Select the “New Step” button to add a condition beneath the “Start and wait for an approval” action.
-
Add the “Condition” action.
-
Insert the “Outcome” dynamic content field from the “Start and wait for an approval” action into the first input field of the condition.
-
Add the text “Approve” to the other input field of the condition.
-
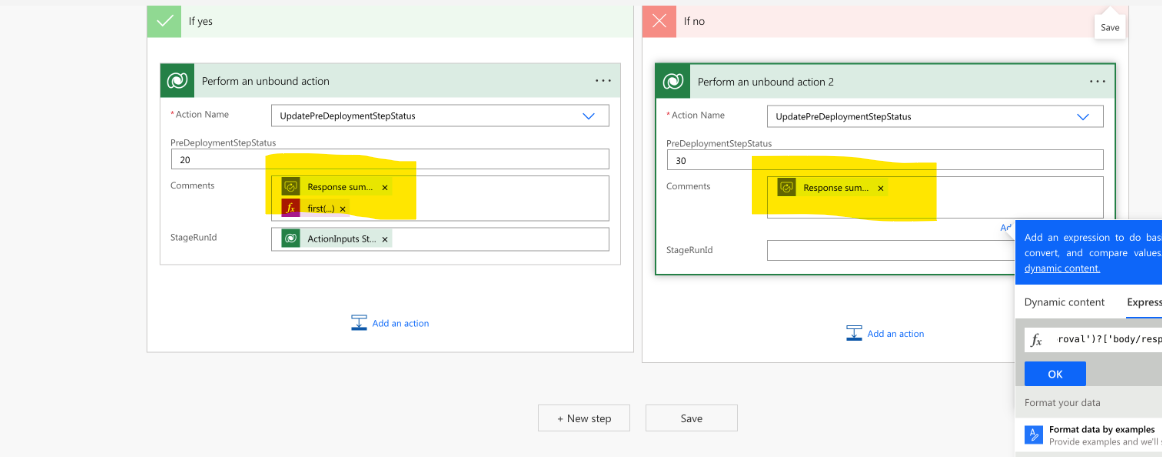
Click the “New Step” button in the “If yes” section of the condition, and add the “Perform an unbound action” action from the Microsoft Dataverse connector.
Choose “UpdatePreDeploymentStepStatus” as the Action Name.
Enter 20 as the PreDeploymentStepStatus (20 is the status ID for approved).
Insert the “Response summary” dynamic content field from the “Start and wait for an approval” action as Comments.
-
Add the following expression via the expression panel to the Comments field and select the blue OK button:
first(outputs('Start_and_wait_for_an_approval')?['body/responses'])?['comments']Include the ActionInputs StageRunId dynamic content field from the “When an action is performed” trigger as StageRunId.
-
Select the “New step” button in the “If no” section of the condition, and add the “Perform an unbound action” action from the Microsoft Dataverse connector.
Choose “UpdatePreDeploymentStepStatus” as the Action Name.
Enter 30 as the PreDeploymentStepStatus (30 is the status ID for rejected).
Include the “Response summary” dynamic content field from the “Start and wait for an approval” action as Comments.
-
Add the following expression via the expression panel to the Comments field and select the blue OK button:
first(outputs('Start_and_wait_for_an_approval')?['body/responses'])?['comments']Add the ActionInputs StageRunId dynamic content field from the When an action is performed trigger as StageRunId.
-
Save the flow
Test the flow
-
Test your approval flow by clicking the “Deploy Here” button in the “Deploy to Prod” stage. Add a comment to the deployment notes and observe the “Your request to deploy here is pending” message.
-
Open your emails and find the approval request.
-
Approve the request
-
After the deployment, you will see it is completed in the pipeline dashboard.
Conclusion
Mastering ALM for Microsoft Power Platform involves setting up a deployment pipeline and creating an approval process using cloud flows. This ensures smooth and controlled application lifecycle management, allowing teams to deploy applications to production environments with proper approvals efficiently.
Start the conversation