

bot%20with%20Microsoft%20Power%20Virtual%20Agent)
Table of Contents
- Power Virtual Agent - low code development platform for conversational bots
- About this Guide
- Bring yourself up to speed
- Create your first chatbot
- Make your first bot a little bit cleaner and prepare the basics
- Add some QnA Topics
- Standard QnA Dialog (advanced - with variable)
- Add IVR (Interactive Voice Response System) Replacement with Conditions and Custom Entities
- Optional: Send an adaptive card to a Microsoft Teams Channel
- Optional: Integrate the bot into a website
- Configure your bot in AudioCodes Voice.AI
- Optional: AI Builder Feedback System with sentiment analysis
- Next steps: Application LifeCycle Management Basics
- Start with CI/CD and export the solution to a GitHub repository
- Next steps: Analytics Basics
- Assets
Build your first (voice-)bot with Microsoft Power Virtual Agent
Power Virtual Agent - low code development platform for conversational bots
Power Virtual Agent is a member of the Microsoft Power Platform.
-
Power Virtual Agents (PVA) are flexible chatbots with artificial intelligence (AI).
-
PVA uses a guided, no-code graphical interface, so you can quickly create your virtual agents and robust chatbots without requiring development skills or data scientists.
-
You can use hundreds of prebuilt connectors (via Power Automate) to connect PVA to your daily goods and services.
-
With PVA, you can monitor and continuously improve chatbot performance with AI- and data-driven insights presented in an easy-to-understand dashboard.
-
With PVA, you could integrate existing bots and skills or integrate PVA bots as a skill to an existing bot.
About this Guide
This guide is my “Power Virtual Agent in a Day” - Workshop Exercise Skript and a good starting point to explore PVA. Imagine not only giving your customers a text-based chatbot on your website, but with this guide, you could serve them in your phoneline before they reach your contact center agent. You can give them answers to their inquiries without making them wait for a free contact center agent. You can do more with less for them.
Bring yourself up to speed
Before starting with Power Virtual Agent, please ensure you meet the prerequisites. Using a trial subscription and a community plan is an excellent start.
-
Power Platform Developer Plan (gives you additional environments and access to the whole Power Platform)
Use GitHub for Application Lifecycle Management and AudioCodes Voice.AI Connect Cloud to give your bot a voice; consider using Voice AI connect enterprise for production.
Create your first chatbot
Launch Power Virtual Agents editing canvas and create your first chatbot.
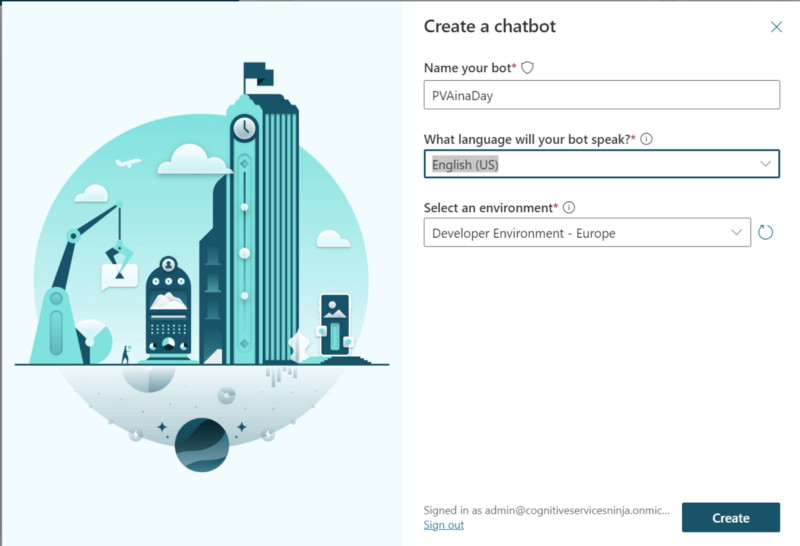
Figure 2: Create your first chatbot
Make your first bot a little bit cleaner and prepare the basics
Microsoft installed some default topics and entities; as we want to begin from nothing, we will delete some of them.
Delete “Lession 3”
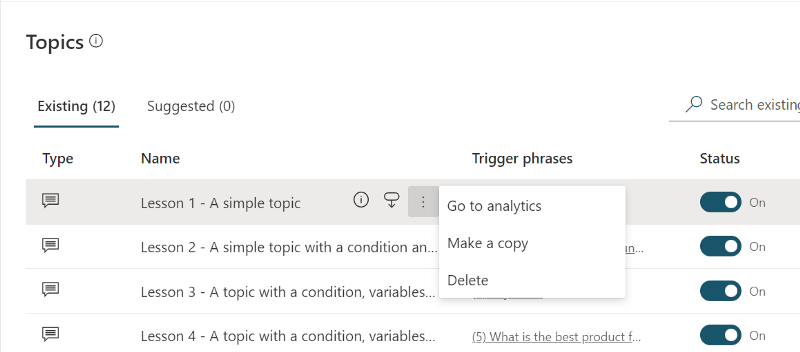
Figure 3: Delete “Lesson 3”
Next, we go to the “Greetings” Topic and change the flow by modifying the first message.
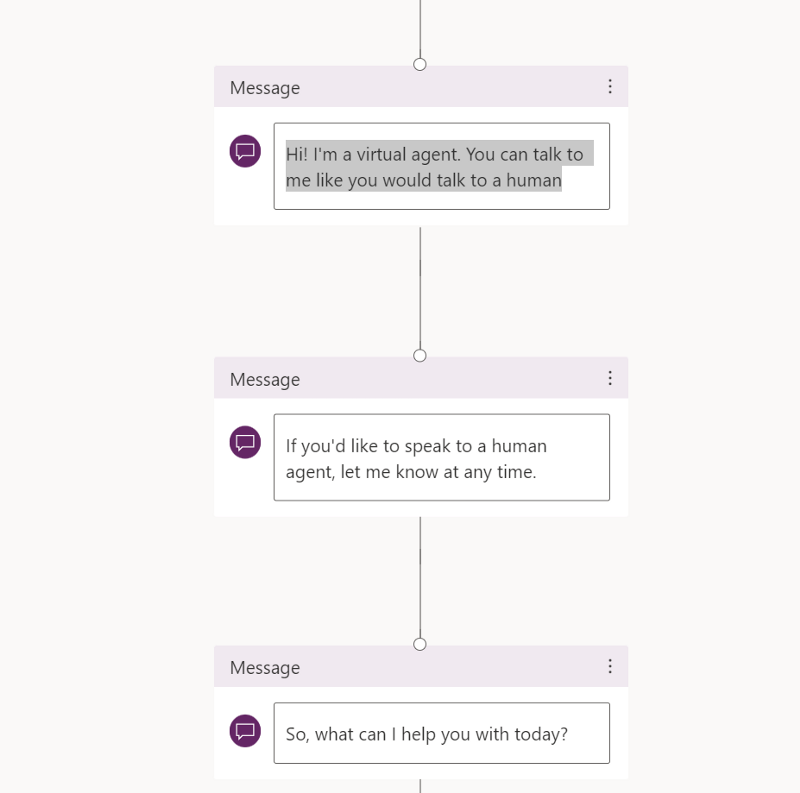
Figure 4: Modify greeting
Keep in mind would like to use the bot on the phone - this means no graphics, no emoticons, no links, and only short sentences.
Next, we need to create a new “Confirmed Success” topic named “Success”.
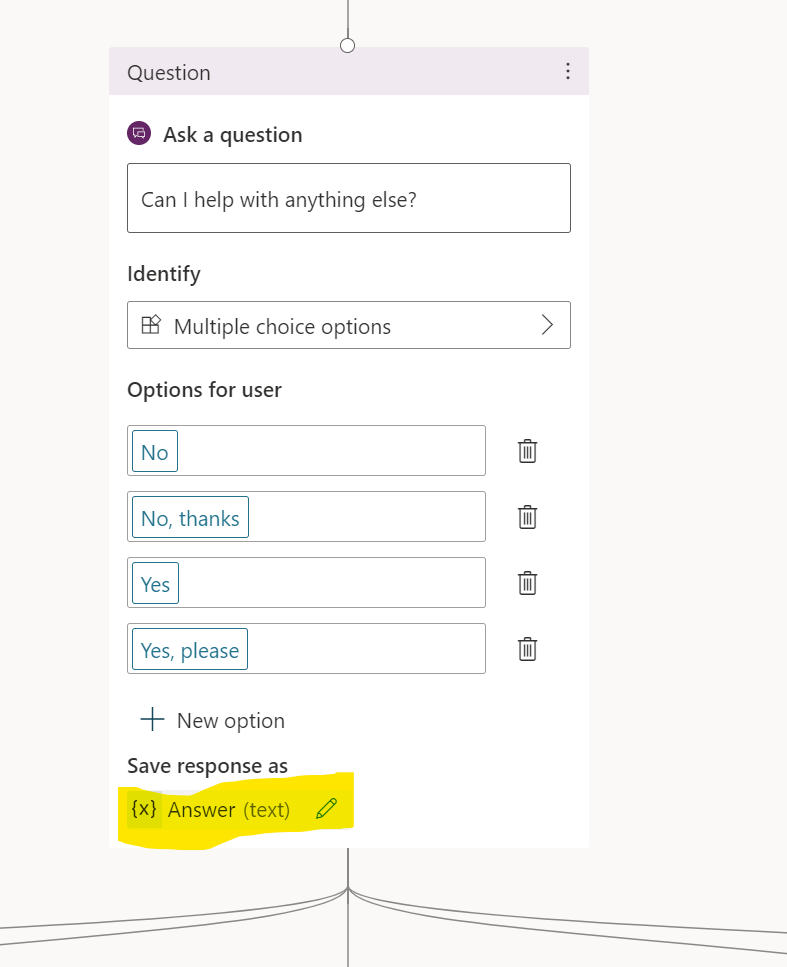
Figure 5: Create a new Question node and name the response as “answer”*
Can I help with anything else?
with answers:
Yes

Yes, please

No

No, thanks
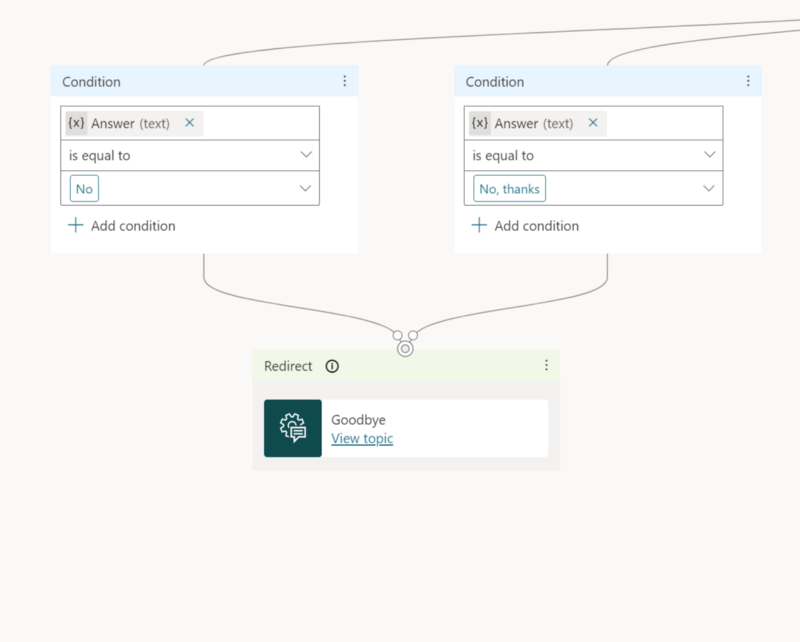
Figure 6: Create two negative conditions*

Figure 7: as-well-as two positive conditions*
This newly created topic will replace the last node, “Confirmed Success” in the “End of Conversation” topic. As “Confirmed Success” is not suitable for voice bots as there is a graphical feedback element involved.
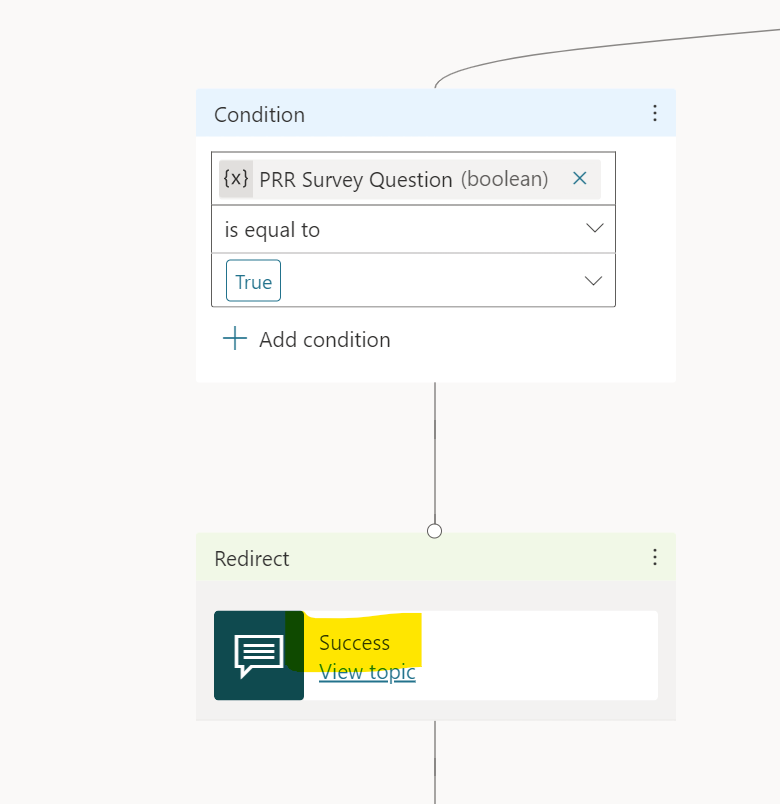
Figure 8: Replace the last node
Next, create a new topic, “transfer_agent_pva”.
This topic will trigger a call transfer from the bot to a human. There are several ways to do so. Here we will work with the third-party solution “Voice AI Connect” from AudioCodes.
Voice AI Connect is available in two flavors:
-
A cloud solution for trials and development purposes. This is what we use in this workshop. You can use your SIP Trunk & Phone Numbers or buy Numbers from AudioCodes.
-
An enterprise solution, you can host yourself on Azure and bring your Carrier or as a fully managed solution with phone numbers. You can ask me to get the insides.
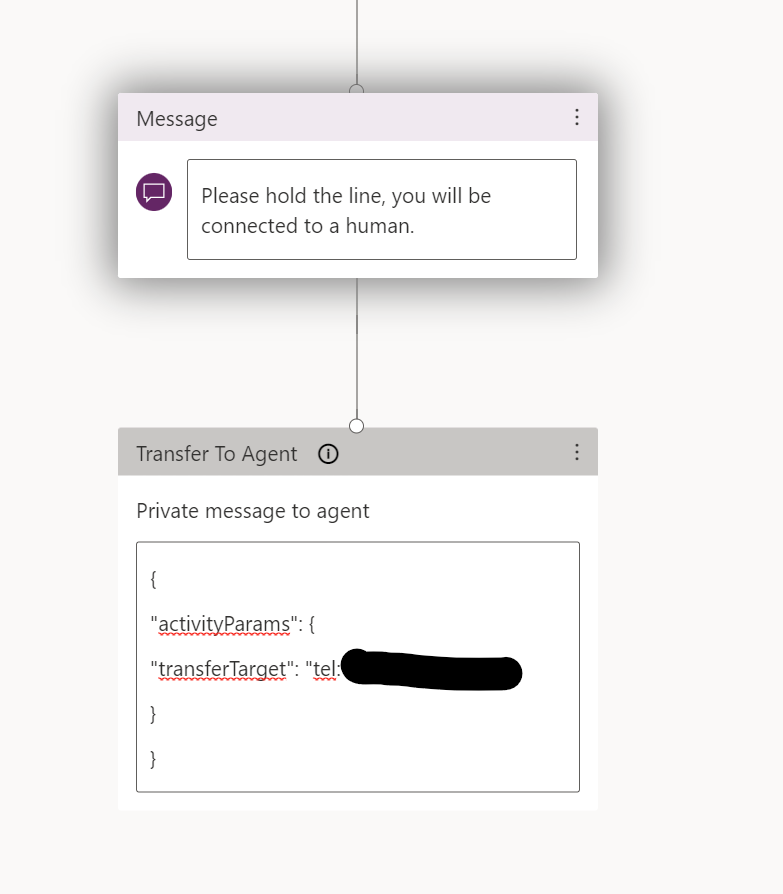
Figure 9: Create a “Message” and a “transfer to agent” node
Please hold the line; you will be connected to a human.

{
"activityParams": {
"transferTarget": "tel:+49000000000"
}
}
Finally, modify the “Escalation” topic to use the newly created “tranfer_agent_pva” topic as the end node.
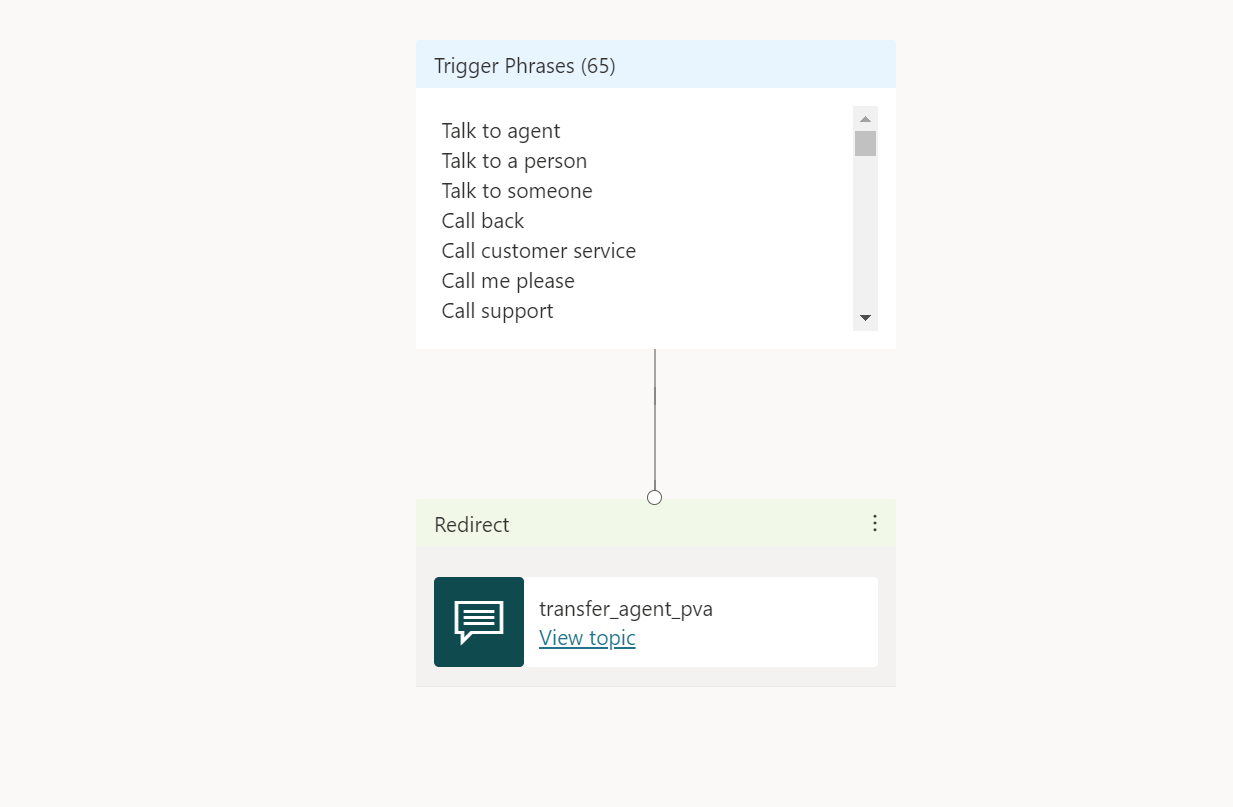
Figure 10: Remove message node and add “transfer_agent_pva” as end node
With these modifications, our bot now has decent start- and end sequences and can act as a phone-enabled assistant.
Add some QnA Topics
To give you an idea of how to create topics for standard Questions, we modify “Lesson 1” and “Lesson 2”. Modifying saves you some work, as you do not need to start from a blank flow.
Standard QnA Dialog (simple)
Let´s assume we want to answer questions, on the phone, regarding our opening hours.
We open “Lesson 1” and rename it to “Opening hours”
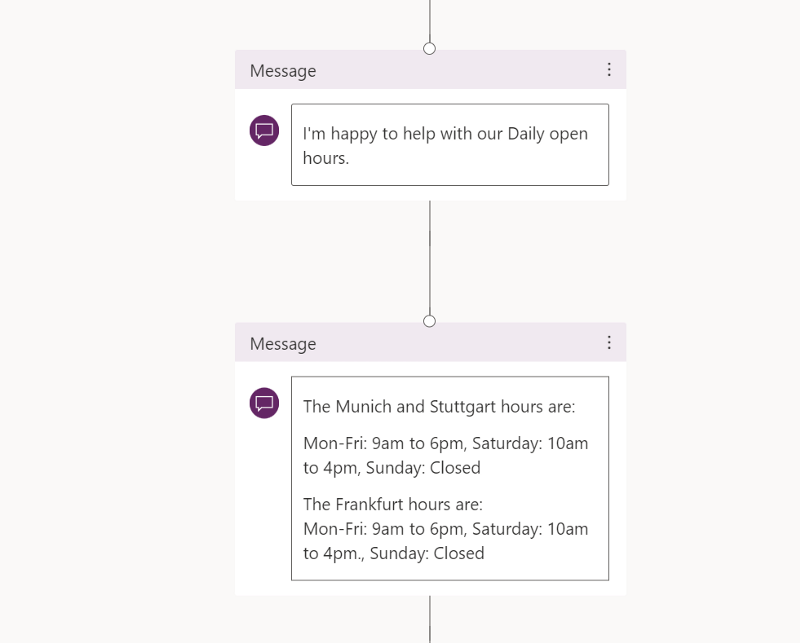
Figure 11: modify both message nodes
We modify both message nodes to reflect this.
I'm happy to help with our daily open hours.

The Munich and Stuttgart hours are:
Mon-Fri: 9am to 6pm, Saturday: 10am to 4pm, Sunday: Closed

The Frankfurt hours are: Mon-Fri:
9am to 6pm, Saturday: 10am to 4pm., Sunday: Closed
Standard QnA Dialog (advanced - with variable)
Let´s assume we want to answer, on the phone, questions regarding our store location.
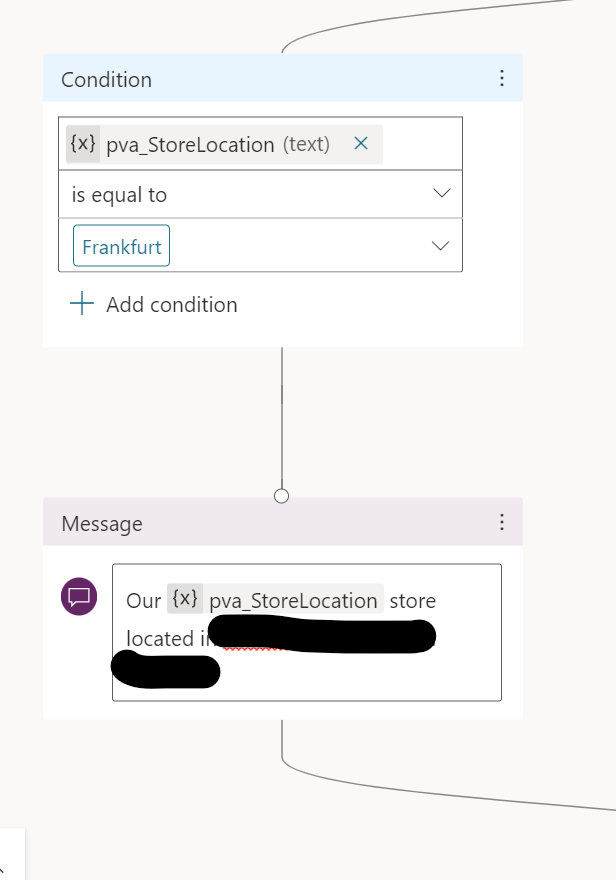
Figure 12: Modify nodes
We rename “Lesson 2” to “StoreLocation” and replace the options with
Which location are you interested in? We are in Frankfurt, Stuttgart or Munich.

Stuttgart

Frankfurt

Munich
and modify the answer in each condition (message node)
Our <variable.pva_StoreLocation> store located in Street Number, Postcode Stuttgart

Our <variable.pva_StoreLocation> store located in Street Number, Postcode Frankfurt

Our <variable.pva_StoreLocation> store located in Street Number, Postcode Munich
Add IVR (Interactive Voice Response System) Replacement with Conditions and Custom Entities
By integrating a custom entry, we make the dialog more natural. The caller can ask to get transferred to a human and can specify the target as an answer to the bot asking for details or go directly by asking for a specific target.
Create Custom Entity
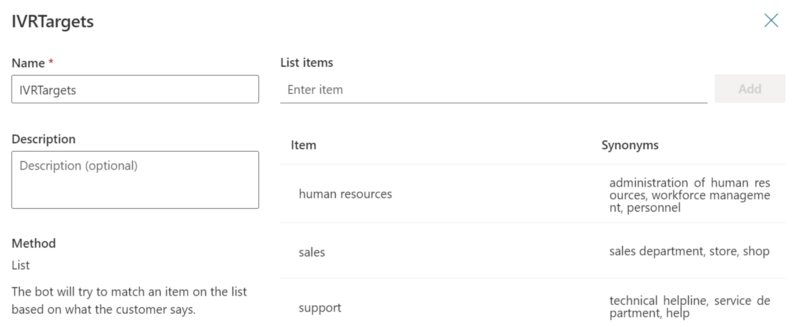
Figure 13: Create a Custom Entity “IVRTargets” as closed list
Create three items with three synonyms each.
Transfer Target 1
Item
human resources
with synonyms
personnel

workforce management

administration of human resources
Transfer Target 2
Item
sales
with synonyms
sales department

shop

store
Transfer Target 3
Item
support
with synonyms
technical helpline

service department

help
Create your AI Attendant as a new topic
Rename “Lesson 4” to “IVRReplacement”
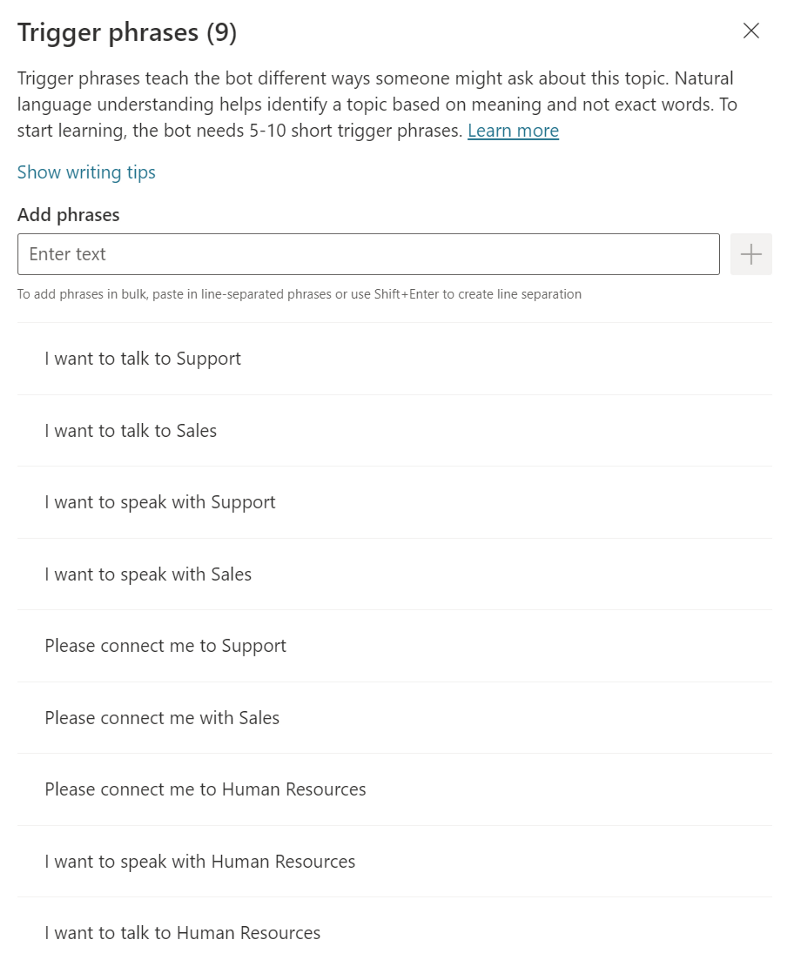
Figure 14: Change trigger phrases
Please connect me to Human Resources
I want to speak with Human Resources
I want to talk to Human Resources
Please connect me with Sales
I want to speak with Sales
I want to talk to Sales
Please connect me to Support
I want to speak with Support
I want to talk to Support
We use the created custom entity “IVRTargets” as a switchboard; if there is no identifiable target, we route to the standard human escalation point “Escalate” with the redirect to “transfer_agent_pva”.
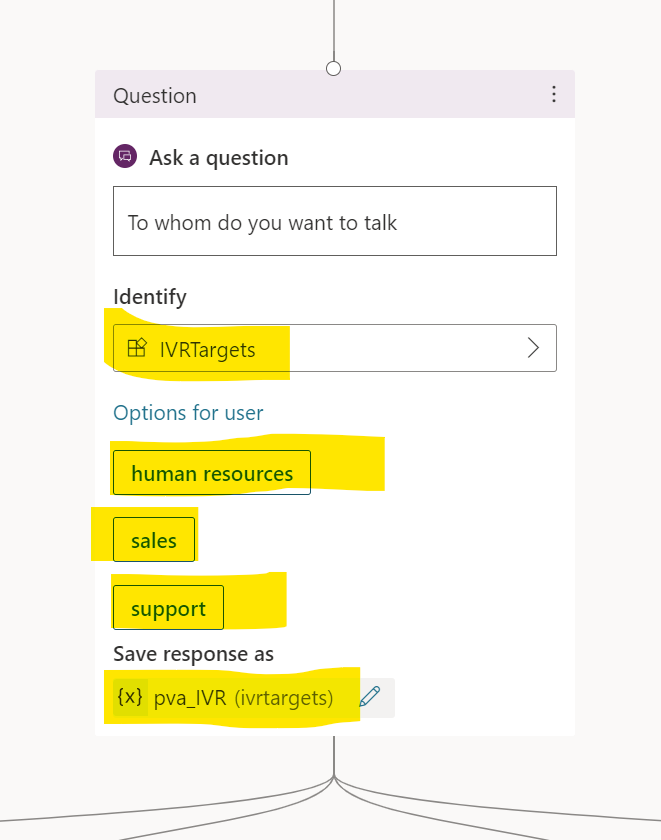
Figure 15: Change the question node, use custom entity “IVRTargets”
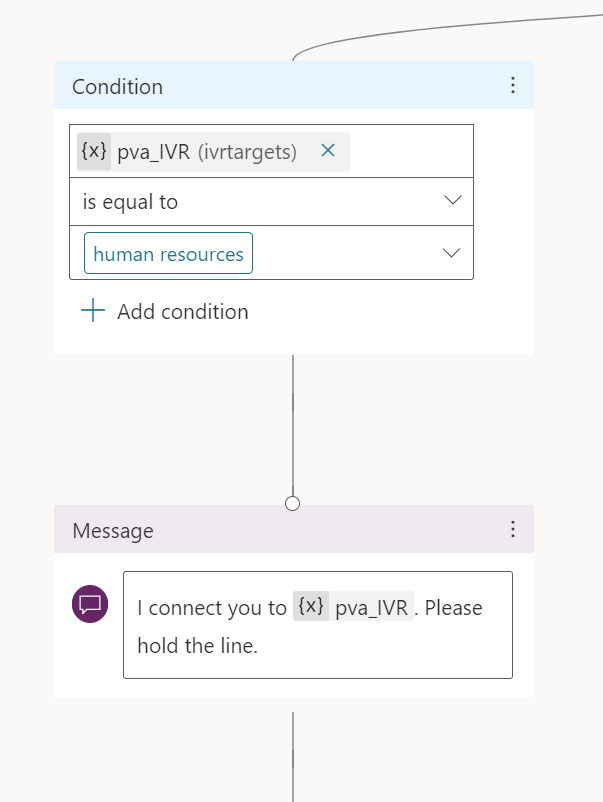
Figure 16: Change condition for human resources
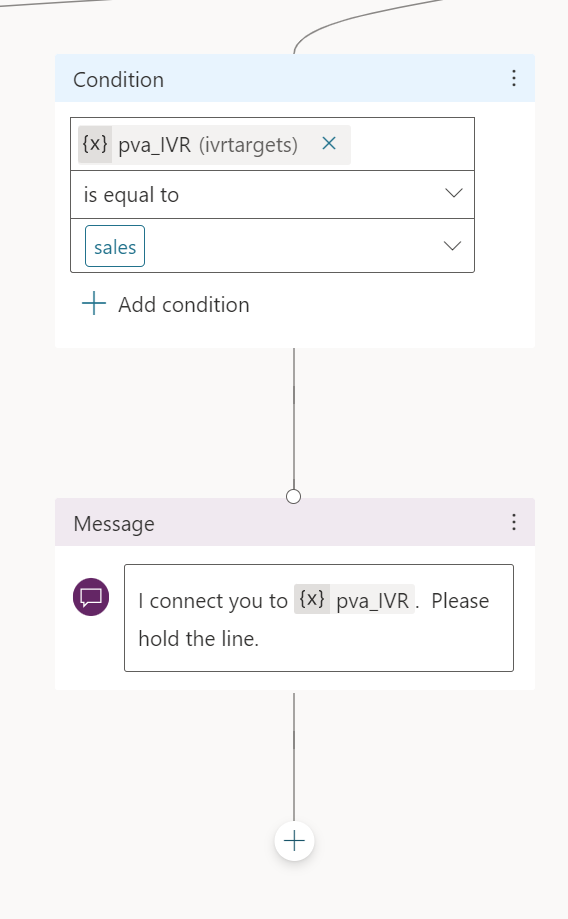
Figure 17: Change condition for sales
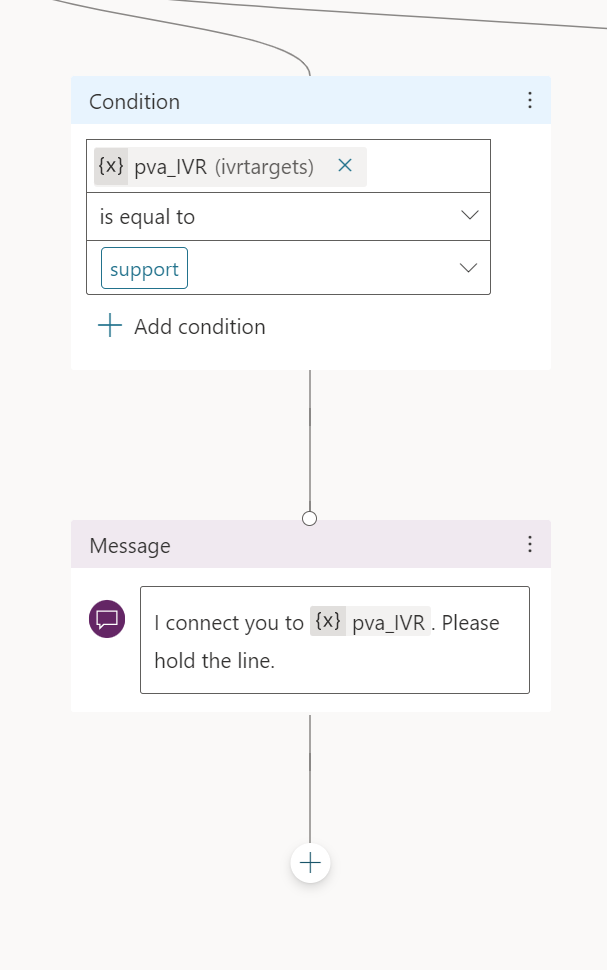
Figure 18: Change condition for support
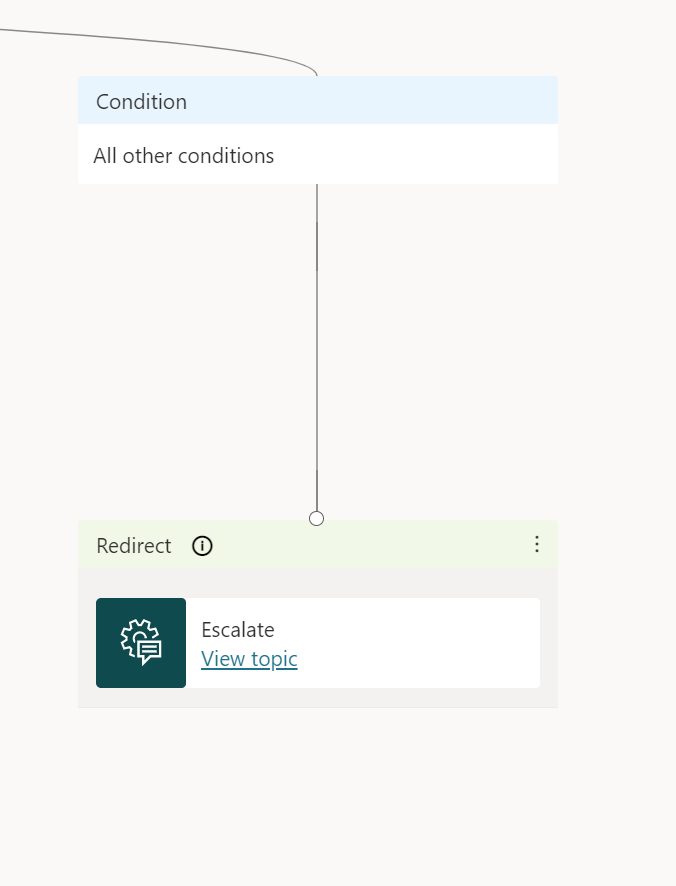
Figure 19: Change condition for others
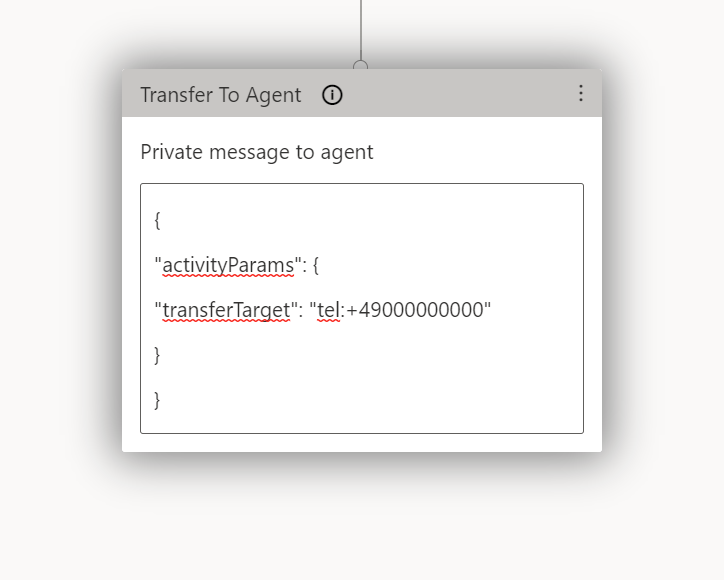
Figure 20: Add a phone number to each target as a private message to agent
{
"activityParams": {
"transferTarget": "tel:+49000000000"
}
}
Optional: Send an adaptive card to a Microsoft Teams Channel
With an adaptive Card, e.g., to a Microsoft Teams Channel, you could give your human agents a chance to speed up their answering to the caller and make the caller’s experience personal.
Add questions to the “IVRReplacement” topic, e.g., asking for the transfer reason and a customer number.
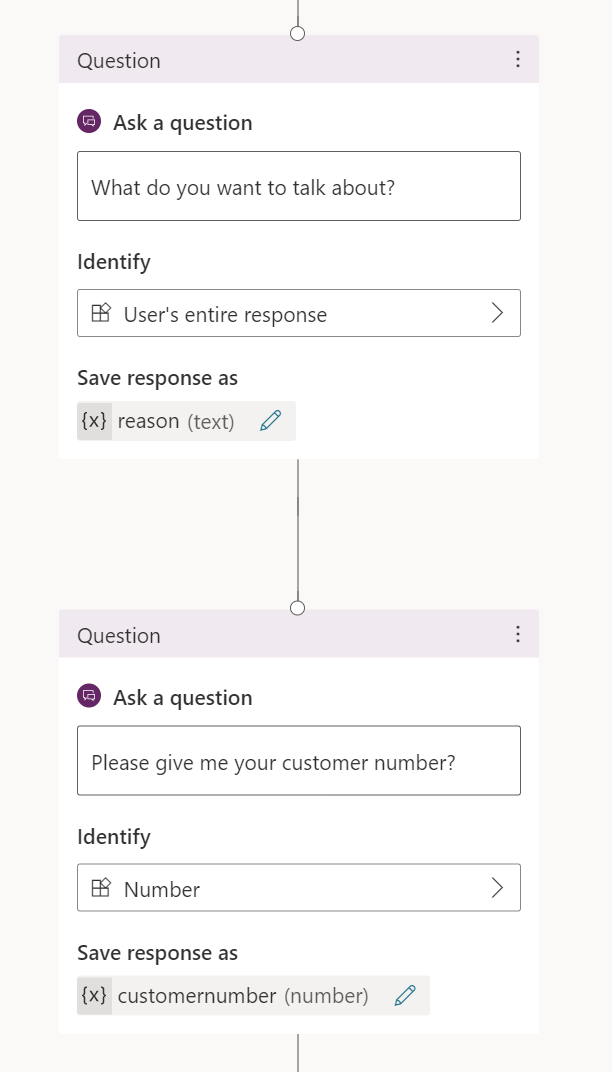
Figure 21: Add questions
The user’s response will be stored into a variable each, which we use as input for our power automate flow.
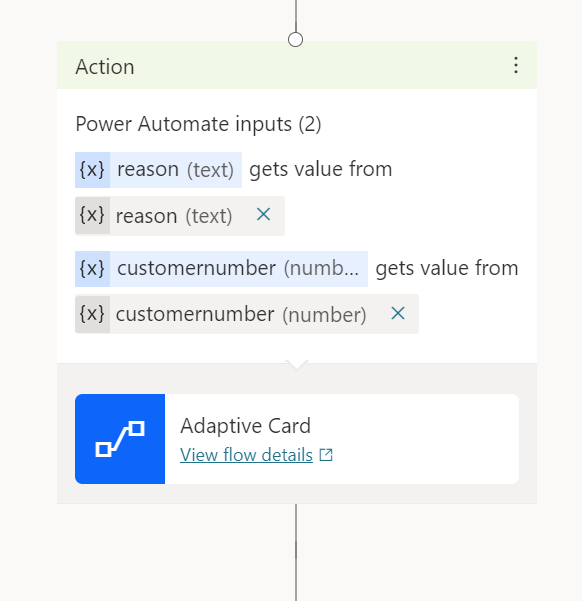
Figure 22: additional flow
The flow itself is straightforward.
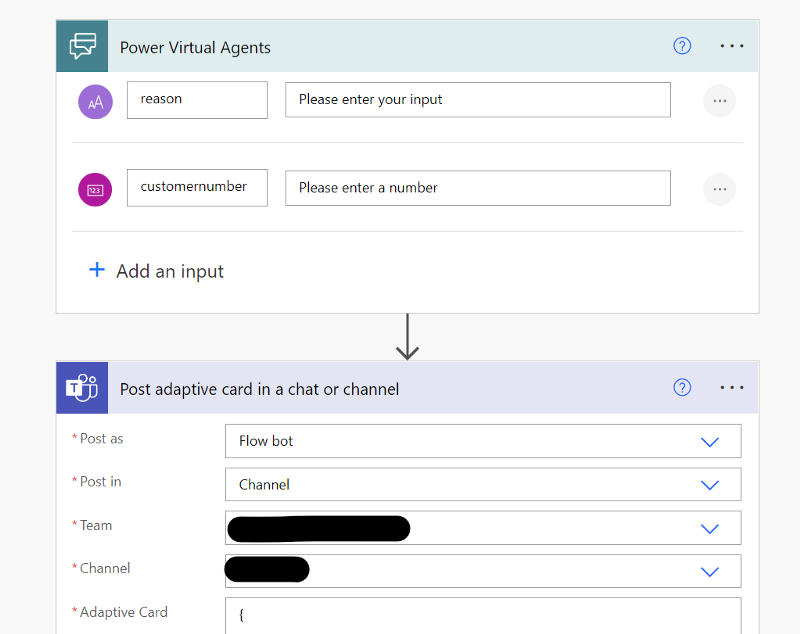
Figure 23: Add “Post adaptive card in a chat or channel” action
an example adaptive card could look like this, you need to edit the parts in “<>”.
{
    "type": "AdaptiveCard",
    "$schema": "http://adaptivecards.io/schemas/adaptive-card.json",
    "version": "1.4",
    "body": [
        {
            "type": "TextBlock",
            "text": "Incoming Call",
            "wrap": true,
            "style": "heading"
        },
        {
            "type": "FactSet",
            "facts": [
                {
                    "title": "Customer Number",
                    "value": "<your variable customer number>"
                },
                {
                    "title": "Call Reason",
                    "value": "<your variable reason>"
                }
            ]
        }
    ],
    "actions": [
        {
            "type": "Action.OpenUrl",
            "title": "Open CRM",
             "url": "<your link to your crm systems record matching customer number>"
        }
    ]
}
The resulting message will look like the picture below.
Please remember not to execute flows in a productive environment with a user’s account; always use service principal accounts.

Figure 24: example message
Optional: Integrate the bot into a website
To integrate your bot into your website, it is a good practice to use Microsoft´s bot framework webchat component. As Microsoft created the “Azure Bot Service” Bots component, we must change the integration code a little to make it work with Power Virtual Agent.
To use the component, you need to extract the bot id from the power virtual agent editing canvas and integrate it into the source.
            var BOT_ID = "#{botidtoken}#";
            var theURL = "https://powerva.microsoft.com/api/botmanagement/v1/directline/directlinetoken?botId=" + BOT_ID;
you can find the ID within the Settings/Channels/Custom Website
(the red part between “/bots/new_bot_” and “/webchat” )
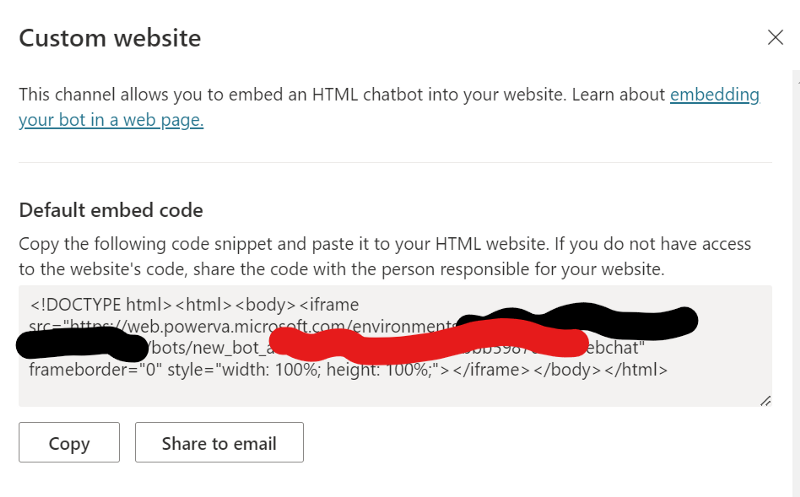
Figure 25: Retrieve the bot ID
You can find a working example on GitHub. The example is prepopulated with configuration options; please see details on the configuration options within the defaultStyleOptions.ts file within the repository of Microsoft´s webchat component.
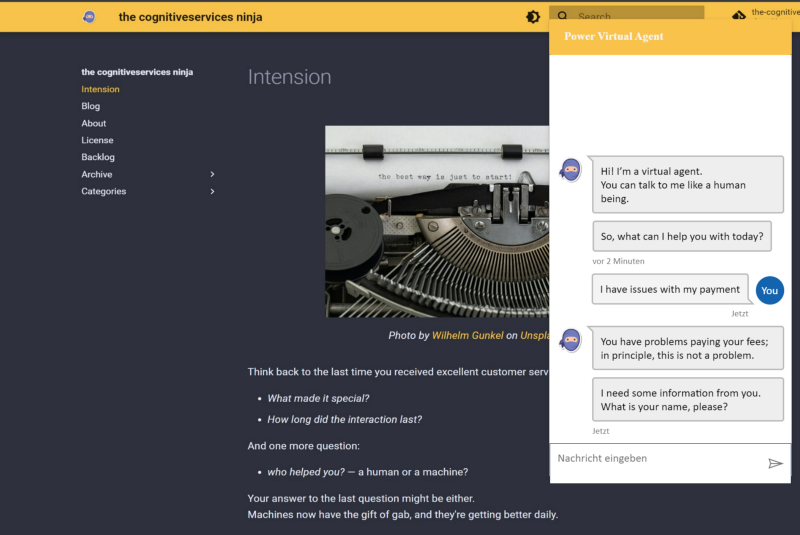
Figure 26: example website
Configure your bot in AudioCodes Voice.AI
Please sign up for “Voice.Ai Connect Cloud” and acquire a Phone Number or configure your sip trunk by following the documentation.
Let´s give the bot a voice. Retrieve your Web channel Secret (in PVA: Settings/Security/Web Channel Security)
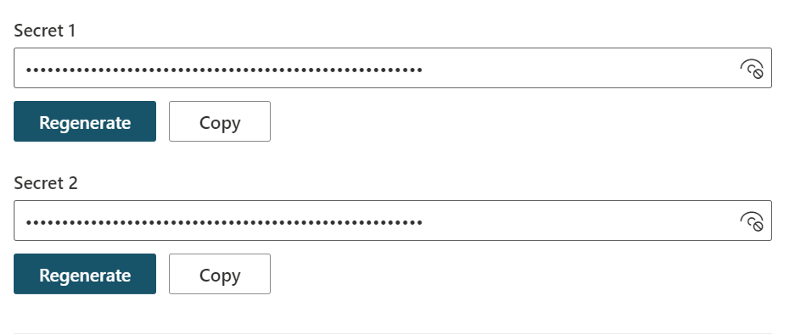
Figure 27: retrieve your Web channel Secret
and go to your Voice.AI Configuration Interface.
Bot Configuration
Add the Bot
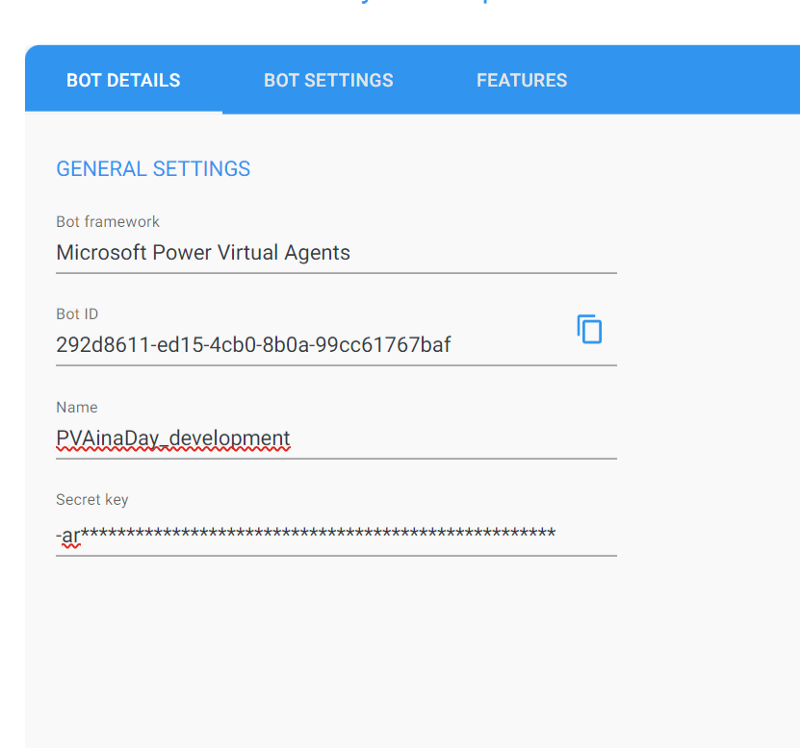
Figure 28: Add details for your bot.
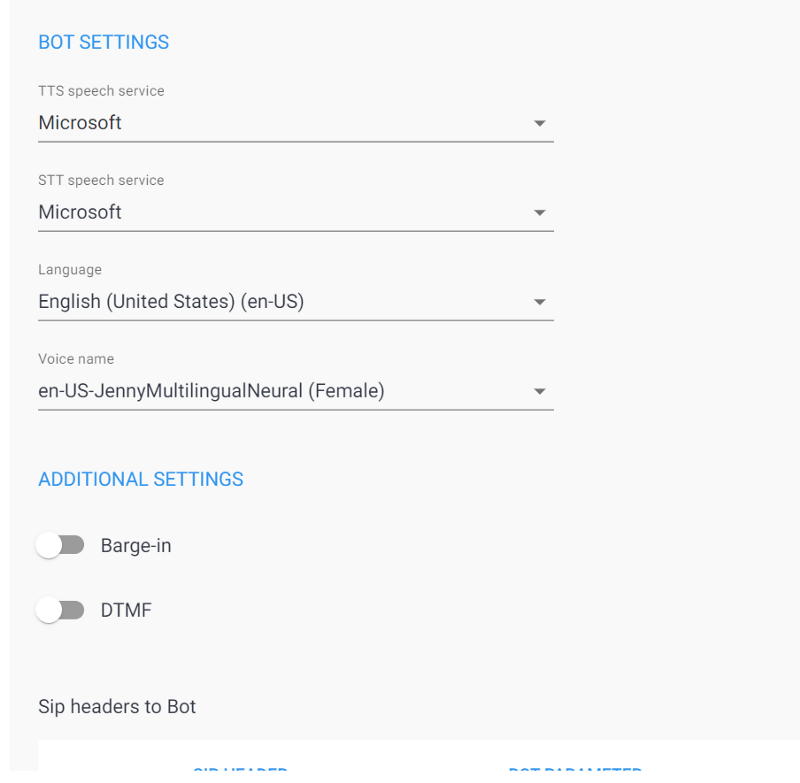
Figure 29: Select TTS, STT and Voice Font
Configure Routing

Figure 30: configure routing “inbound”

Figure 31: configure routing “transfer”
Optional: AI Builder Feedback System with sentiment analysis
prerequisites
If you work in a trial environment, you will be asked to apply for an AI Builder trial during the flow creation. There are no cost implications.
With Power Virtual Agents, the use cases are limitless and based on the requirements, and we can keep pushing the boundaries of its abilities. By integrating Power Virtual Agents with Power Automate and AI Builder we can further expand the horizons of its usage by leaps and bounds. Here we will see how to leverage AI builder and make use of Sentiment Analysis to analyze the textual feedback from the user.
Create a new topic “Feedback”

Figure 32: create trigger phrases
and add 2 Nodes,
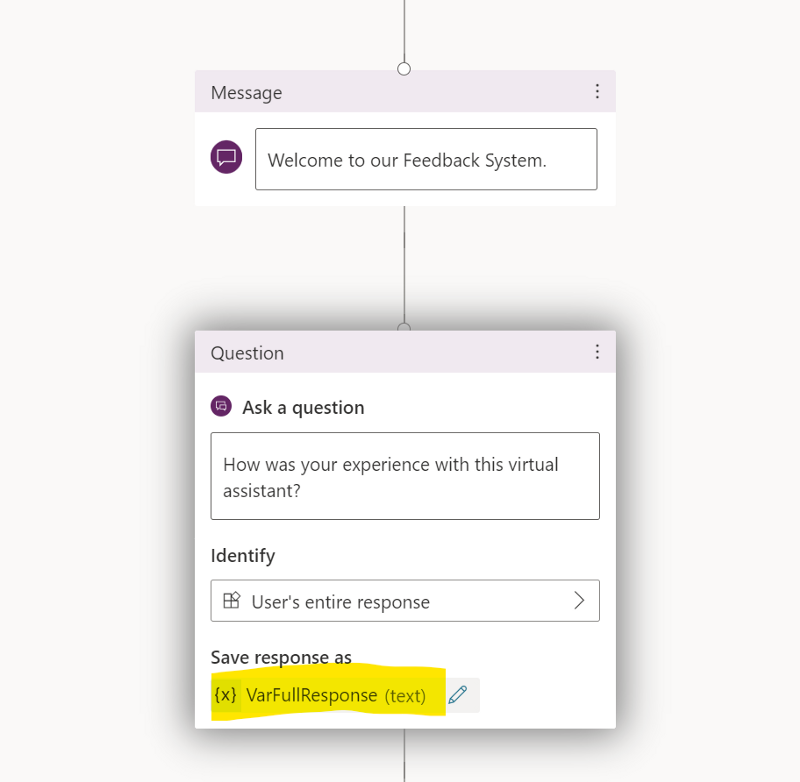
Figure 33: one message node to greet the User and a Question node to get Feedback*
Welcome to our Feedback System.

How was your experience with this virtual assistant?
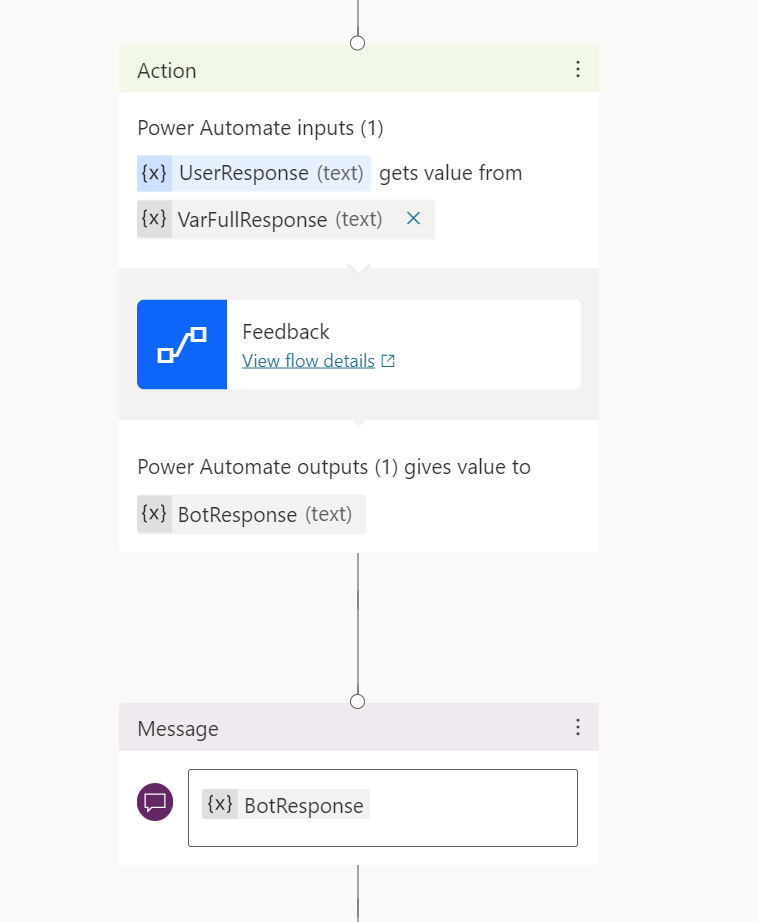
Figure 34: Create a new Power Automate Flow with input and output and later a message to display the output
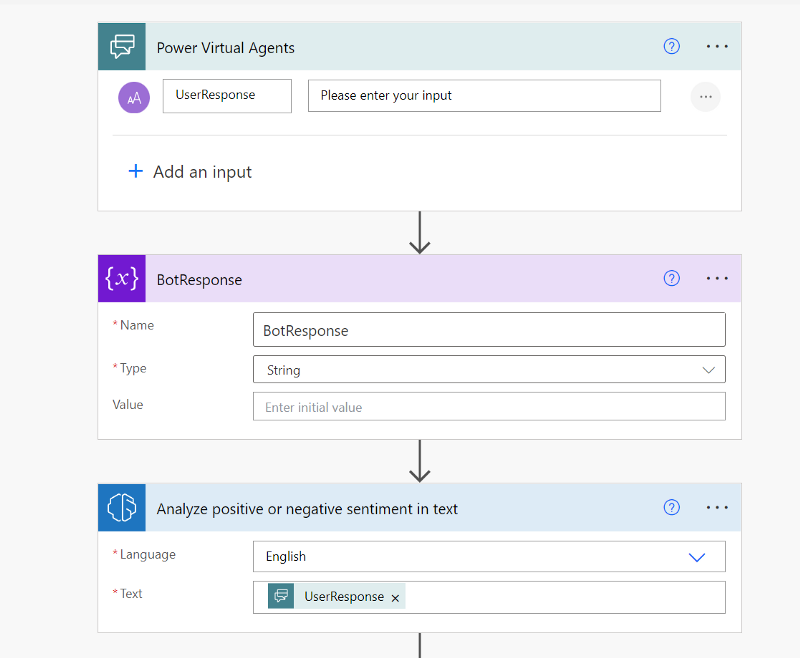
Figure 35: initialize a variable and analyse the sentiment
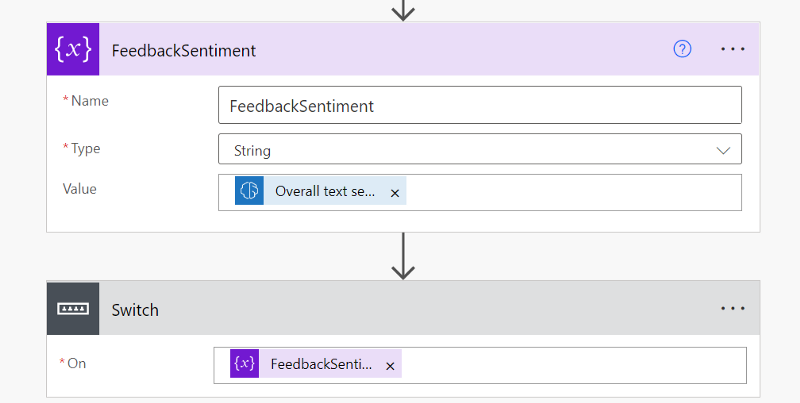
Figure 36: initialize a variable, set it to “overall text sentiment” and a switch
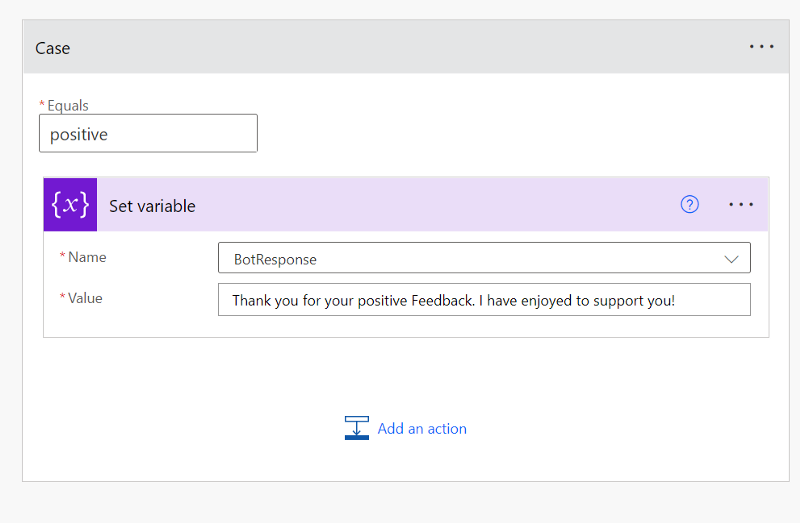
Figure 37: create a positive case with Response to User
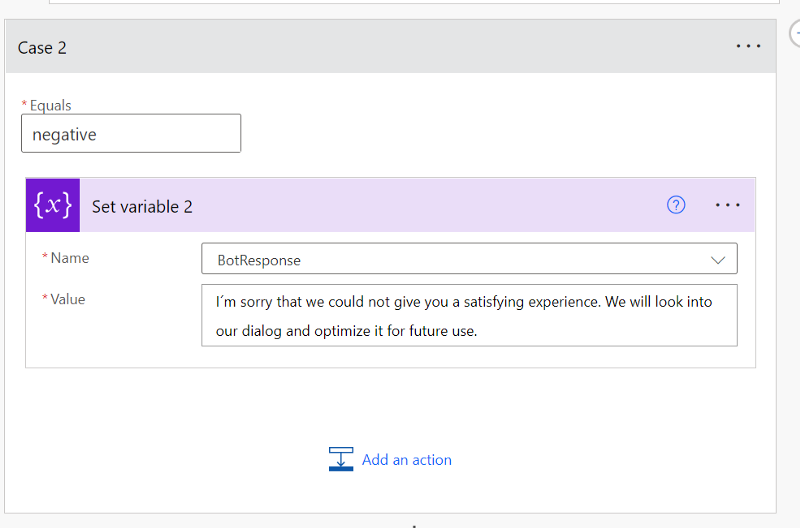
Figure 38: create a negative case with Response to User
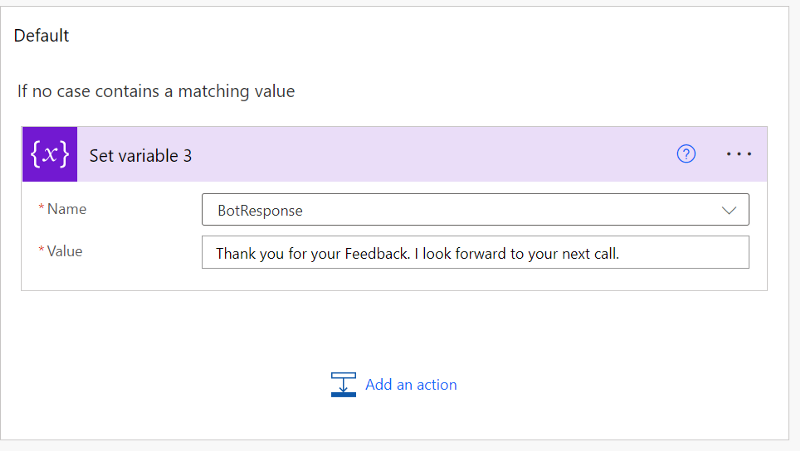
Figure 39: create a neutral/default case with Response to User
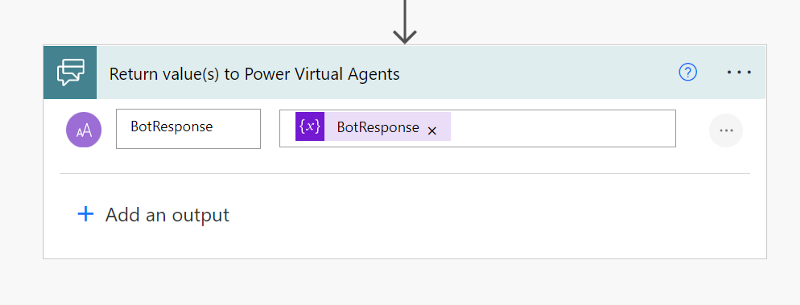
Figure 40: return the Response to PVA
Next steps: Application LifeCycle Management Basics
How to make a Virtual Power Agent more secure
Our solution should not run under a user account. This principle is a best practice for the power platform and allows the IT department to monitor and manage the virtual agents. It is the basis for application lifecycle management.
Create a service principal account
To create a service principal account, we need to set up an App Registration in Azure Active Directory.
In the Azure portal, select “Azure Active Directory” in the left pane and select “App registrations”, and click on “New registration”.
On the “Register an application” page, enter your application’s registration information:
-
In the Name section, enter a meaningful application name like “Botplatform”
-
Select “Accounts in any organizational directory” option from Supported account types section.
-
Click on “Register” to create the application
Upon creation of the application registration, please note and save the “Directory (tenant) ID” and the “Application (client) ID” of the application.
On the navigation panel of the Overview page, select “API permissions”.
-
Choose “+ Add a permission”, and in the “Microsoft APIs” tab, choose “Dynamics CRM”.
-
In the “Request API permissions” form, select “Delegated permissions”, check “user_impersonation”, and then choose “Add permissions”.
-
Back in the “Request API permissions” form, choose “PowerApps Runtime Service”, select “Delegated permissions”, check “user_impersonation”, and then choose “Add permissions” again.
-
For the third time in the “Request API permissions” form, choose “APIs my organization uses”. Search for “PowerApps-Advisor” using the search field, and select “PowerApps-Advisor” in the results list. Select “Delegated permissions”, check “Analysis.All” rights, and then choose “Add permissions” for the last time.
Next, proceed to create a client secret. In the navigation panel, select “Certificates & secrets”:
-
Below “Client secrets”, select “+ New client secret”.
-
In the form, enter a description and select “Add”. Record the secret string; you will not be able to view the secret again once you leave the form.
Create an application user
To deploy solutions as part of a CI/CD pipeline, an “Application user” needs access to the environment. An “Application user” represents an unlicensed user that is authenticated using the application registration completed in the previous steps.
-
Navigate to your environment on Power Platform Admin Center
-
Navigate to “Settings” > “Users + permissions” > “Application User”.
-
Select “+ new app user”. A panel will open on the right-hand side of the screen.
-
Select “+ Add an app”. A list of all the application registrations in your Azure AD tenant is shown. Proceed to select the application name from the list of registered apps.
-
Under “Business unit”, in the drop-down box, select your environment as the business unit.
-
Under “Security roles”, select System administrator, and then select “create”. This will allow the service principal access to the environment.
With the “App registration” and the “Application User”, we can use “GitHub Actions” to manage our environments. Yes, environments as we need several to work safely and professionally. Please register this Application User in every environment you deploy (dev, staging, testing, and production).
Create a Solution
A solution is a kind of “application container”. In this “box”, you will find everything related to your project.
Within the solution, you will find all your bots, flows, connector references, and other stuff a developer produced.
-
Navigate to https://make.powerapps.com and sign in with your credentials. Click the “environment selector dropdown” in the header and select your development environment.
-
Click the “Solutions” area in the left navigation, and click the “New solution” button to create a new solution.
-
In the side panel that appears, enter the application’s name and click the “Add Publisher” option.
-
On the new solution panel, select the publisher you just created and click “Create” to create a new unmanaged solution in the environment.
-
In the solutions list, select the solution you just created and click the “Edit” button.
-
Your new solution will be empty, and you need to add components to it. Click the “+ Add existing” and select all elements related to your bot platform.
Start with CI/CD and export the solution to a GitHub repository
GitHub actions can export your bot environment (as an unmanaged solution) from a development environment to a GitHub Repository.
Create a new secret for Service Principal Authentication
-
Navigate to your repository and click “Settings”, then expand “Secrets”, and then “click Actions”.
-
On the Secrets page, name the secret “POWERPLATFORMSPN”. Use the client secret from the application registration created in Azure Active Directory and enter it into the Value field, and then select “Add secret”. The client secret will be referenced in the YML files used in your Github actions.
Create a GitHub Action for exporting the solution
Replace the solution name, in the example, with the name of your solution.
name: export-and-branch-solution-universal
# Export solution from DEV environment
# unpack it and prepare, commit and push a git branch with the changes

on:
  workflow_dispatch:
    inputs:
      # Change this value
      solution_name:
        description: 'name of the solution to worked on from Power Platform'
        required: true
        default: DemoEnvironment
       #Do Not change these values
      solution_exported_folder:
        description: 'folder name for staging the exported solution *do not change*'
        required: true
        default: out/exported/
      solution_folder:
        description: 'staging the unpacked solution folder before check-in *do not change*'
        required: true
        default: out/solutions/
      solution_target_folder:
       description: 'folder name to be created and checked in *do not change*'
       required: true
       default: solutions/
      DEV_ENVIRONMENT_URL:
        description: 'Development environment url.'
        type: string
        required: true
      CLIENT_ID:
        description: 'Client ID.'
        type: string
        required: true
      TENANT_ID:
        description: 'Tenant ID'
        type: string
        required: true

jobs:
  export-from-dev:
    runs-on: windows-latest
    # or you can say runs-on: ubuntu-latest
    env:
      RUNNER_DEBUG: 1

    steps:
    - uses: actions/checkout@v2
      with:
        lfs: true

    - name: who-am-i action
      uses: microsoft/powerplatform-actions/who-am-i@0.4.0
      with:
        environment-url: $
        app-id: $
        client-secret: $
        tenant-id: $

    - name: export-solution action
      uses: microsoft/powerplatform-actions/export-solution@0.4.0
      with:
        environment-url: $
        app-id: $
        client-secret: $
        tenant-id: $
        solution-name: $
        solution-output-file: $/$.zip

    - name: unpack-solution action
      uses: microsoft/powerplatform-actions/unpack-solution@0.4.0
      with:
        solution-file: $/$.zip
        solution-folder: $/$
        solution-type: 'Unmanaged'
        overwrite-files: true

    - name: branch-solution, prepare it for a PullRequest
      uses: microsoft/powerplatform-actions/branch-solution@v0
      with:
        solution-folder: $/$
        solution-target-folder: $/$
        repo-token: $
        allow-empty-commit: true
Use the Github action
The action is triggered manually - event: workflow_dispatch. Go to Actions, select the Workflow on the left sides’ menu, click “Run Workflow”, no need to change the options, and then click on the green “Run Workflow” button.
Check the import
and create a merge request to the master branch If this is the first time you are using this feature, you can rename the imported solution to “main”. If this is the first + x time, create a merge request to the main branch.
what´s next
Create additional actions to export the solution as a managed solution to your test environment. Create additional actions to deploy the solution to your production environment after a release.
Link to my GitHub Repository - ALM for PVA
Next steps: Analytics Basics
a curated link list
Key Concepts
Analyze bot performance and usage
Review overall analytics for your bots
Analyze customer satisfaction
Identify overall trends in customer satisfaction, and where satisfaction is falling behind
Analyze topic usage
See how individual topics are doing and how well they’re working at resolving issues
Analyze session information
Analyze billed session information
Understand how sessions are being billed, based on their usage
Assets
Download a copy of the bot in this article as a solution from GitHub.
solution-file
Start the conversation